Maintenance of Macgregor type of steel hatch cover on board of bulk carrier.
Poor maintenance of hatch covers causes leakage leading to cargo damage and represents a hazard to the ship and its crew. Although hatch covers are simple and durable, their sealing gaskets are easily damaged. The quality of sealing is affected by lack of alignment and poor gasket compression. When hatch covers are opened at the end of an ocean voyage, look for signs of leakage such as rust staining or drip marks.
Regular adjustment and repair, by ship’s staff, will reduce the overall cost of maintenance. Painting double drainage channels will help to prevent corrosion.
Always keep a detailed record of maintenance. Take care during extensive hatch cover repair to avoid cover distortion.
Rubber Gaskets: -Keep clean and free from paint. If physically damaged, permanently set-in or aged, replace with minimum 1 metre lengths. Always follow the manufacturer’s instructions when renewing gaskets.
Gasket Channels:- If gasket channels are badly corroded, causing the hatch packing to hang loose, the packing should be removed and the channel repaired by welding new metal strips which should be painted before fitting new rubber. Always follow proper fire prevention safety procedures. Make sure that cargo spaces are free of cargo and combustible material. When conducting extensive structural repairs, remove the hatch covers to shore.
Hatch Cover Structure:- Repair or replace any damaged, worn or defective hatch covers or comings. Consult with the ship’s classification society before commencing repair. Paint new structure immediately.
Compression Bars:- Effective sealing is only possible with a straight, undamaged and non-corroded compression bar. Compression bars which are not in this condition should be repaired or replaced, taking care to align the bars properly. Remember to carry out a chalk test to check alignment, both during and after repair.
Landing Pads:- Hatch sealing is arranged by design to give the correct compression of the gasket when there is metal-to-metal contact on the hatch landing pad, side plate, or inter panel block. If landing pads are reduced in height (check with manufacturers’ drawings) because of wear, repair is essential.
Hatch Wheel Track Ways:- Track ways can corrode. They are weakened by abrasive wear and tear. When weakened, track ways can distort and break, affecting hatch movement and alignment. Deterioration is visible to the naked eye. Repair by replacing the worn or damaged material with sufficient new material to restore strength. Always keep hatch wheel track ways clean and painted.
Hatch Coamings:- Look for cracks at coaming corners. If any are found, consult the ship’s classification society before commencing repairs in case the coaming needs to be reinforced. Examine coaming support brackets for corrosion where they connect with the ship’s deck. Make sure coamings and their support brackets are painted. Coamings can be damaged by cargo equipment during loading or discharge. Look out for damage and repair if found.
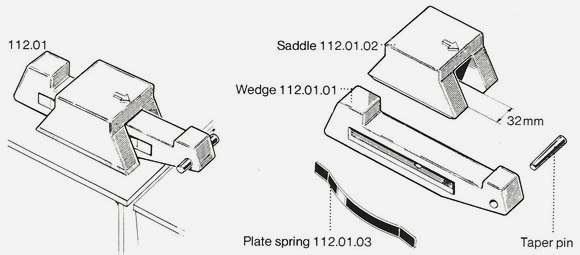
Hatch Cleats and Wedges:- It is important for compression washers to be adjusted correctly. A locking nut for adjusting compression is situated at the base of the cleat. The procedure to alter compression (see illustrations) is as follows:
- Close hatch and secure for sea;
- Place the cam of the cleat in the hatch socket as if to lock it, but leave it unlocked (the cam should move freely and fit snugly in its housing);
- Adjust the locking nut until the compression washer touches the underside of the hatch coaming or its steel washer;
- Turn the locking nut one full turn to achieve the desired tension;
- Do not over-tighten;
- Protect the thread on completion.
When closing and securing a hatch for sea passage, check the tension in side cleats. Cleats should never be adjusted in isolation, adjust all cleats along the hatch skirt at the same time.
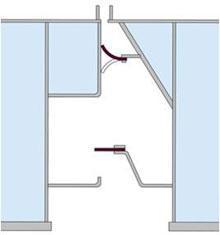
Hatch Cross-Joints:- It is essential for the cross-joint to be in good condition and properly aligned.
Maintenance and repair should focus on:
- Examination of the cross-joint structure for corrosion.
- Examination of joint hinges for pin wear, blade cracking or weld failure.
(Re-grease the hinge pin bushes making sure grease reaches the hinge pins).
- Examination of the steel-to-steel inter-panel blocks and locators for wear. (Check the top plate of hatch panels, they should be level when closed).
- Checking the gap between panels when they are closed. Misalignment could be caused by an incorrectly adjusted cylinder or the wheel tracks could be worn.
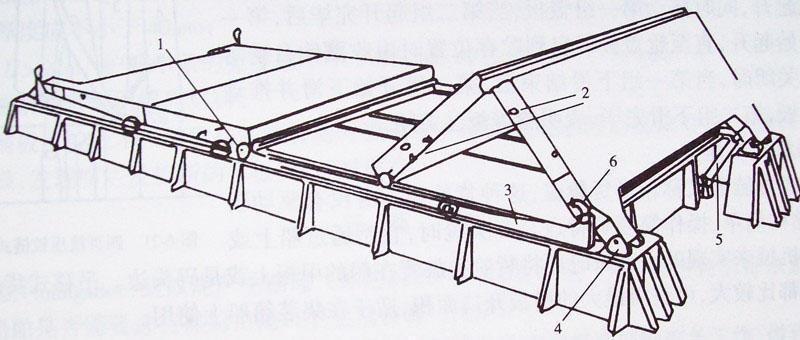
Hatch Wheels:- Hatch wheel spindles and bearings (where fitted) need to be greased regularly. Check the wheel spindle for wear and the wheel housing for physical damage. Repair if the spindle is worn or if the wheels are out of alignment.
Drain Channels and Non-Return Valves:- Clean coaming tops and cross-joint channels by removing any loose scale or cargo residue by brushing or hosing. Clean coaming drain holes and check that the nonreturn valve is functioning.
Greasing:- Wheel spindles, cleat spindles, hinge pins, hydraulic cylinder protective sheaths, cleat wedges, drive chain sprockets, toothed rack and cylinder spherical bearings need to be kept well-greased. Re-grease every month if necessary, and always apply new grease after the ship has passed through heavy weather.
Painting:- Corrosion occurs mainly at the panel ends along the cross-joint or where access is difficult, but it can also occur on the underside of a panel, especially along hatch beams. Regular painting will be necessary.
Inert Gas:- Hatch covers with a double skin, in the form of a closed box, are filled with inert gas. After structural repair, the inner spaces must be re-inerted. This is done by inserting special tablets (available from the hatch cover manufacturer) into the space and welding shut. Never allow water to penetrate the box construction.
Hydraulic Systems and Components:- The cleanliness and viscosity of hydraulic oil must be checked. Samples of the oil should be sent to a chemist for testing (use the same company that checks and tests your fuel and lubricating oil). The hydraulic system is provided with bleed points from which samples can be taken. Hydraulic oil should be changed every five years or after there have been significant repairs, such as piping or cylinder replacement. Hydraulic oil filters should be changed every twelve months. Do not contemplate repairing the hydraulic system without the proper components and skilled fitters.
-
 Cargo Solved MMD Past Papers Phase 1 Chief MatePrice range: ₹ 244.00 through ₹ 576.00
 -
 2nd Mate (F.G.) & NCV (NWKO) – Volume 3 (Cargo)₹ 219.00
 -
 Cargo Consolidated Notes for Phase 1 Chief Mate₹ 361.00